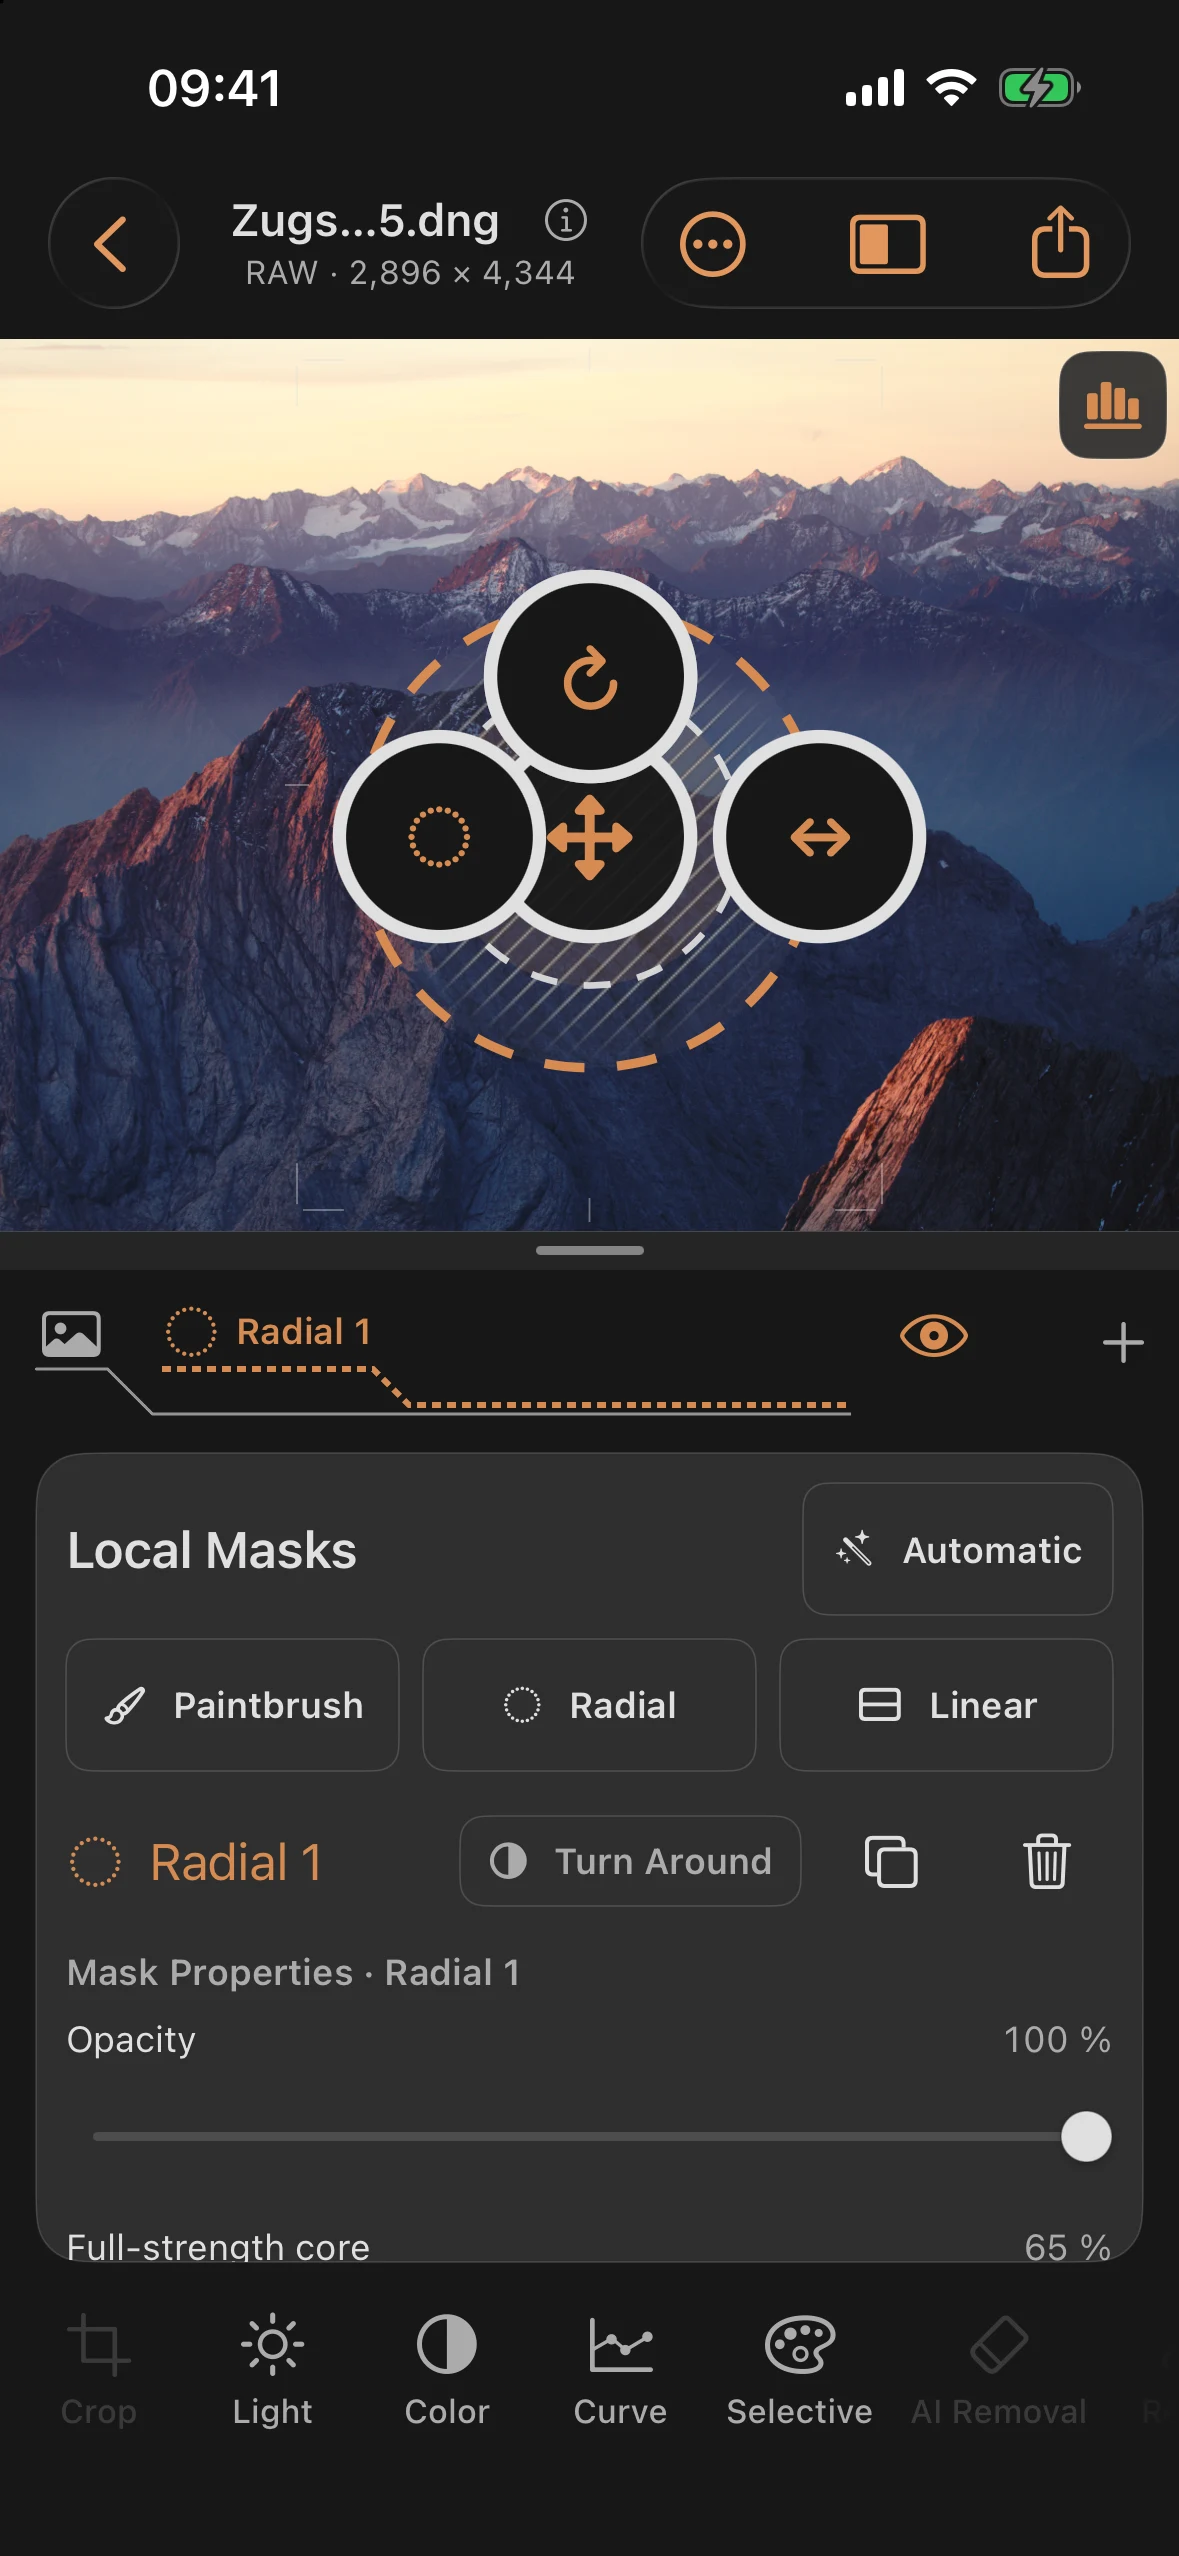
Masks: Localized Editing
The Masks tool confines an edit to a specific area of the image. Inside a mask, the same controls are available as in the base — Light, Color, Selective, Curve, and Details — just limited to the mask’s area of effect.
Access only through the layer ribbon
Masks do not appear in the tool rail. Create one with the + on the right of the layer ribbon: tap New layer and choose Mask. The accessibility label of the plus is Add new layer. As long as there is no layer yet, the words “New layer” appear next to the plus; tapping them opens the same choice. Tap an existing mask’s tab to edit it.
Base with the photo symbol sits on the far left of the ribbon. The tabs scroll horizontally; faded edges indicate the direction of additional layers. In the layer profile beneath them, masks appear as dashed lines.
The four mask types
| Type | Kind | Description |
|---|---|---|
| Paintbrush | manual | freely painted area, with adjustable size and effect |
| Radial | manual | starts as a circle; can be reshaped into an oval, with a full-strength core and soft falloff |
| Linear | manual | gradient mask with a hard edge and a soft transition |
| Automatic | generated | foreground/background from the depth map, or main subject via subject detection |
Automatic masks
The creation menu is split into two sections:
From depth map (disabled without an existing depth map):
| Subtype | Source |
|---|---|
| Foreground | Depth map — masks the near areas of the image |
| Background | Depth map — masks the far areas of the image |
Local subject detection:
| Subtype | Source |
|---|---|
| Main Subject | Vision framework, local on-device, independent of any depth map |
If subject detection can’t find a clear main subject, this appears:
“Vision couldn’t identify a clear main subject in this image.”
Sky detects the sky using a small bundled model, entirely on your device. The mask works with local adjustments and as a Polarizer region, and follows straightening and perspective corrections. Check its coverage around difficult building edges or clouds.
Select an object
On supported devices running iOS 27 or later, + → Mask → Automatic → Select object lets you select an object by tapping it. The required model is prepared automatically and reused; its initial download may require an internet connection. Image analysis takes place on the device.
The first point includes the object. Add up to 13 points in total with Include and Exclude to refine the preview. Points can be removed or positioned with the coordinate controls. Accept the preview to create a mask, or discard it to leave the edit unchanged. The saved mask follows the image through crop and geometry changes and does not need a depth map. Existing object masks remain usable on devices that cannot create new ones.
A round start inside the visible image
A new radial mask starts as a circle in image pixels, not a stretched copy of the photo’s aspect ratio. It occupies about 90% of the shorter visible edge after reserving room for its handles. Crop, zoom, and pan are taken into account so that the controls remain reachable. Existing masks keep their saved geometry. Drag the handles to turn the circle into an oval if needed.
Controls per mask type
Opacity applies to every mask; all other controls are type-specific:
| Control | Range | Default | Applies to |
|---|---|---|---|
| Opacity | 0 to 100% | 100% | all mask types |
| Full-strength core | 0 to 98% | 65% | Radial only |
| Center X | −100 to 200 | center of the visible area | Radial only |
| Center Y | −100 to 200 | center of the visible area | Radial only |
| Mask width | 10 to 400% | depends on the visible image area | Radial only |
| Mask height | 10 to 400% | depends on the visible image area | Radial only |
| Edge softness | 0 to 100% | 35% | Paintbrush |
| Flow range | 4 to 100% | 35% | Linear |
| Edge softness | 0 to 100% | 8% | Automatic |
| Brush size | 2 to 35% | 12% | Paintbrush only |
| Brush effect | 5 to 100% | 100% | Paintbrush only |
| Center X/Y (Linear) | 0 to 100 | 50 | Linear only |
| Angle | −180° to +180° | 0° | Linear only |
Position X/Y as the accessible brush point (0 to 100, default 50) is an additional, slider-based substitute for touch-painting with the brush — not a control of its own.
RAW difference: none for these geometry and opacity controls. As soon as you edit Light, Color, Curve, or Details inside a mask, the same RAW/non-RAW ranges apply as described in each tool’s own chapter.
Explainer text in the panel
“From the fixed inner ring to the outer ring, the effect fades smoothly to zero.” — Radial only
“Before the solid line, the mask is at full effect. Up to the dashed line, it fades smoothly to zero.” — Linear only
“Create a mask, or select an existing layer above. Light, Color, Curve, and Details are then available unchanged.” — empty state with no active mask
Duplicating a mask
Select a mask and choose Duplicate mask. The copy retains its shape, opacity, and local adjustments, but can then be edited independently. Duplicating a mask can be undone in one step.
Inverting
An invert toggle acts on the mask’s entire area of effect — it reverses the mask itself, not individual values within it.
Paintbrush: stroke management
With the paintbrush, you can delete just the last stroke (“Delete Last Stroke”) or clear the whole mask at once (“Delete All Strokes”). The “Accessible Brush Point” option introduces a tappable X/Y substitute for touch-painting — useful when precise finger-painting isn’t practical.
Practical tips
- For a dodged sky, Linear (a hard horizon line, soft transition into the foreground) usually works better than Radial.
- Only use the “Foreground”/“Background” automatic masks when a depth map is present — without one, both options stay disabled. Main Subject and Sky do not need a depth map; Select object is also available on supported devices.
- Chapter 2 of the tutorial series (“Dodging & Burning”) shows, on a dodged sky, how the Light tool behaves inside a mask.
- Don’t forget edge softness after painting — a too-hard edge on a paintbrush mask often gives the mask away more than a visible tonal change does.
Adjusting Brush size shows a light circle with a dark outline in the visible image. It follows the slider and accounts for zoom and crop. The pixel readout gives the nominal diameter in the original image. The preview remains briefly after release and does not paint a stroke. Soft brush influence can extend beyond the circle.
Adjusting Feather adds a filled, softly fading stamp to the brush preview. It shows the transition even before any stroke has been painted and works in paint and erase modes. The preview uses full flow to make softness visible independently of the selected flow.