Overview: How the Editor Is Organized
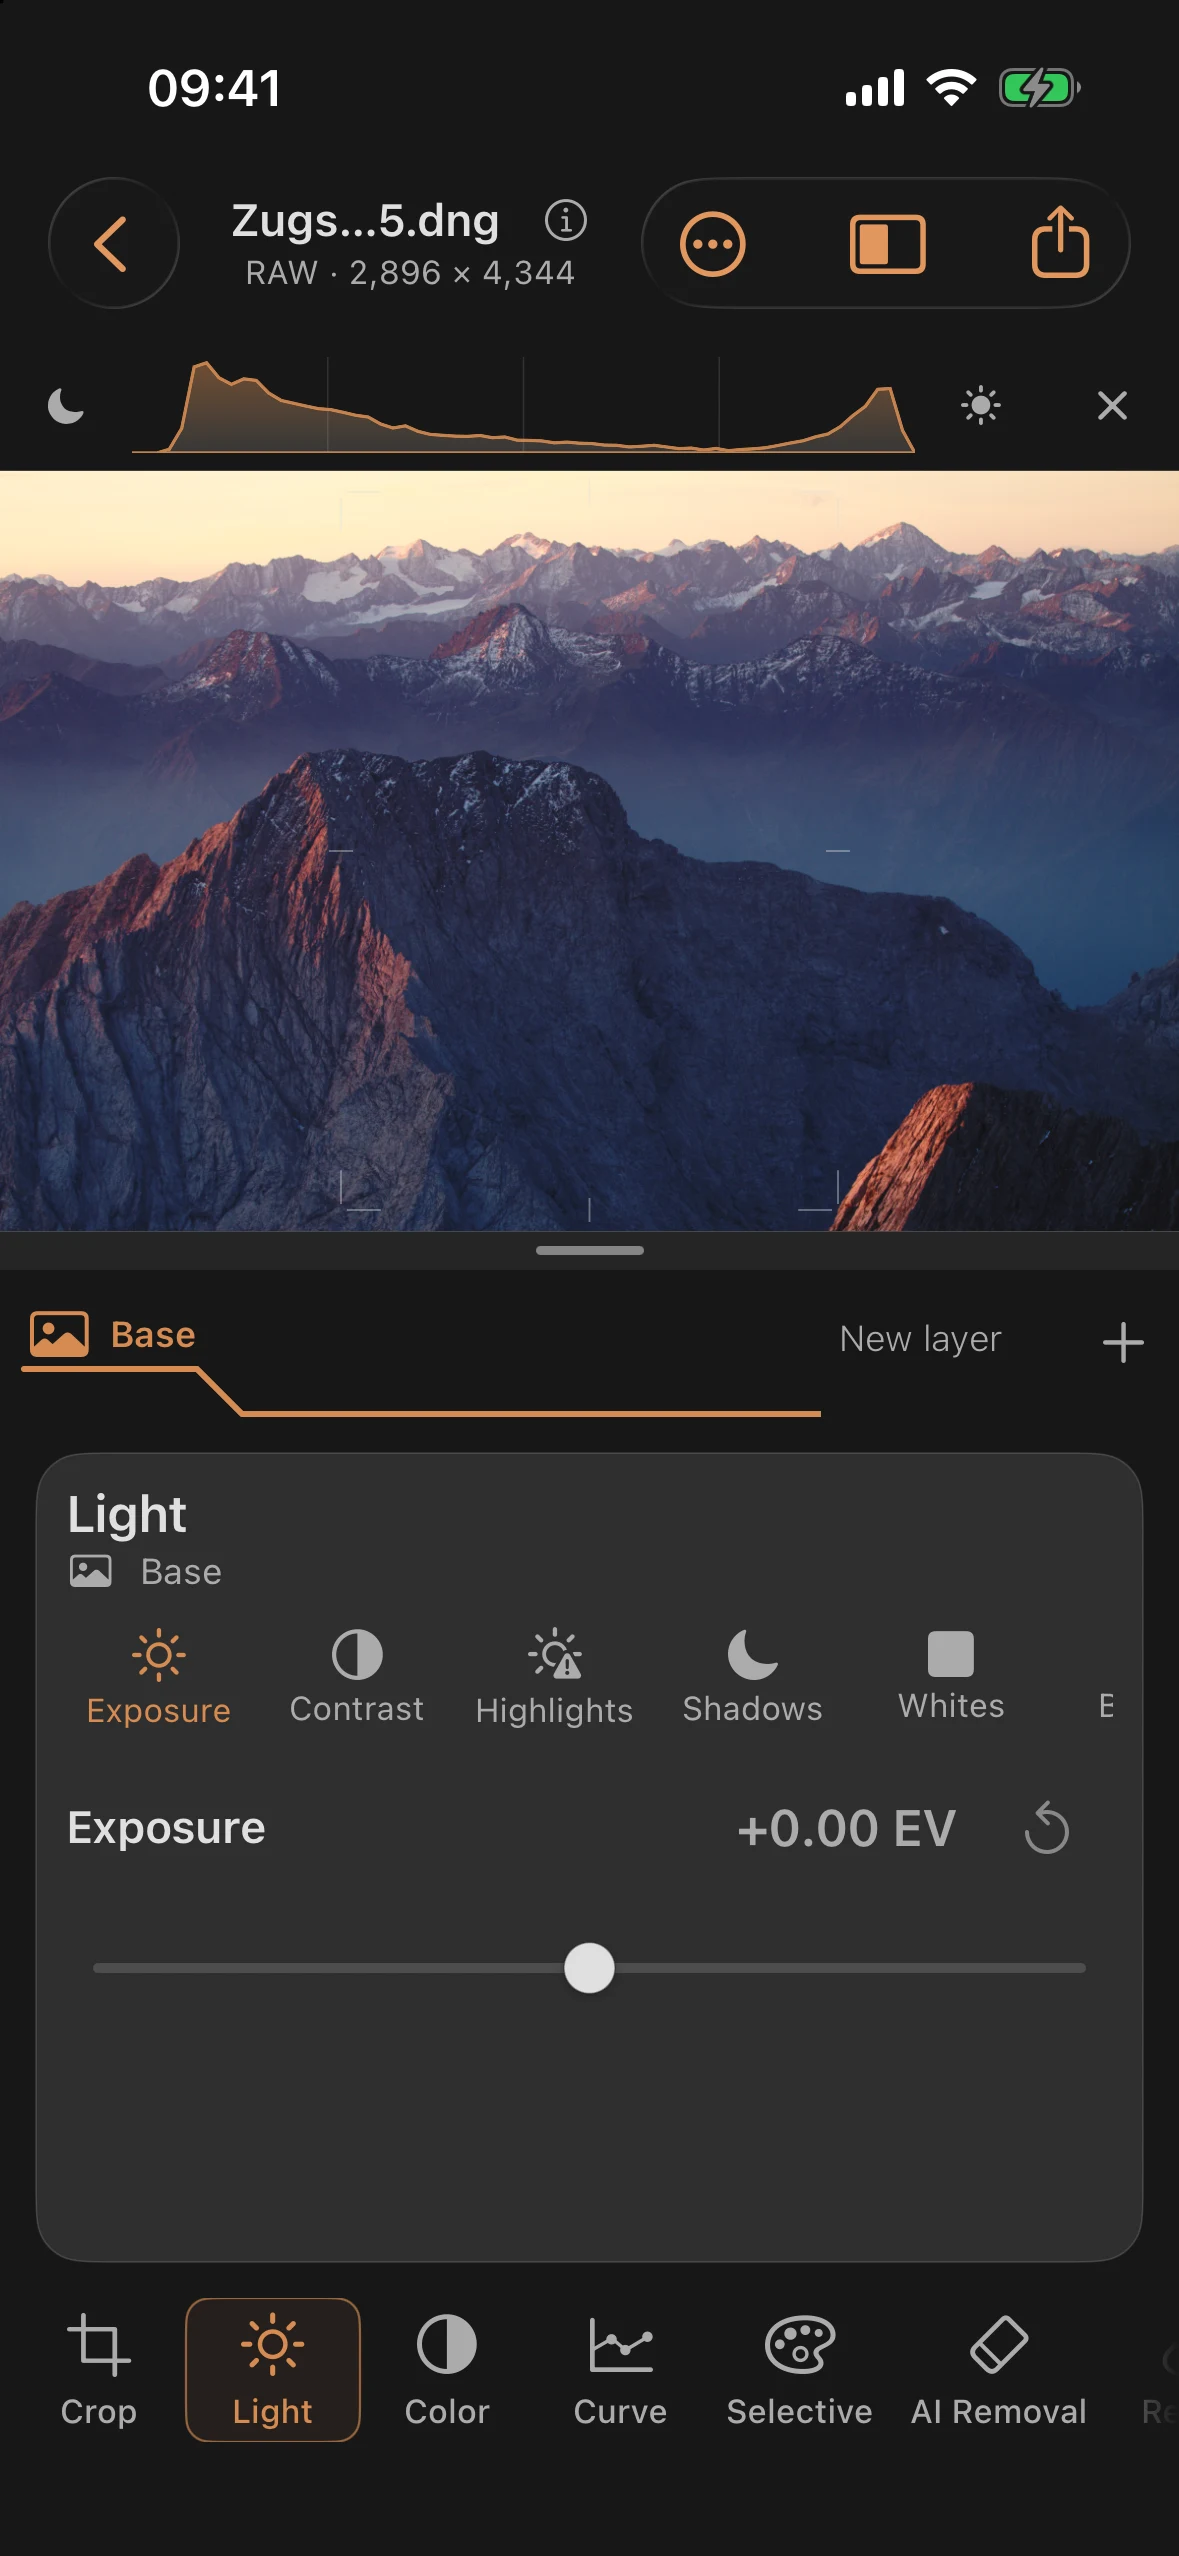
The editor is organized into three fixed areas: the tool rail along the bottom edge, the layer ribbon above it, and the adjustment panel above that, holding the controls for whichever tool is currently selected. This page describes the layout and links to the individual tool chapters.
The three areas
- Tool rail (bottom): Shows the eleven directly accessible tools as tappable icons. Crop additionally opens its own geometry mode.
- Layer ribbon (above it): Tabs for the layers in the current edit. On the far left is Base with the photo symbol; it is always present and affects the whole image. Masks and filters follow. The selected layer shows its symbol and name, the others only their symbol. Tapping a tab switches the active layer, and the panel below then shows its controls.
- Adjustment panel: The controls, presets, and explainer text for the active tool or active layer.
Beneath the tabs lies the layer profile: one line per layer, stacked from the bottom up. The lowest line is the base. Filters appear in their filter color, masks as dashed lines, the selected layer in amber. With many layers the lines get thinner, and from eight layers on they are bundled.
Masks, filters and reflection reduction do not have separate entries in the tool rail. You add new layers with the + on the right of the layer ribbon: it is called New layer and offers Mask or Filter. As long as there is no layer yet, the words “New layer” appear next to the +; tapping them opens the same choice. Tap a layer’s tab to edit it. Reflection reduction belongs to the Polarizer among the full filters.
Tools and features
| Tool | Icon | Effect | Available in masks |
|---|---|---|---|
| Light | sun.max |
Exposure, contrast, and the four tonal zones (highlights, shadows, whites, blacks) | yes |
| Color | circle.lefthalf.filled |
White balance, vibrance, and saturation | yes |
| Selective | paintpalette |
Hue, saturation, and brightness individually per color band | yes |
| Curve | chart.xyaxis.line |
one combined tone curve across five fixed points | yes |
| Crop | crop |
cropping, straightening, and keystone correction | no (Base only) |
| Masks | circle.dotted.circle |
localized editing via paintbrush, radial, linear, or automatic masks | — (this tool itself) |
| Depth | camera.aperture |
simulated depth of field based on a depth map | no (Base only) |
| Lens | camera.metering.center.weighted |
simulated lens characters (distortion, vignette, bokeh shape) | no (Base only) |
| Filter | via + → Filter | full, graduated and creative filters as stackable layers | — (layers of their own) |
| Details | scope |
sharpening, structure, deliberate blur, and noise reduction | yes |
| Reflection reduction in the Polarizer | rectangle.on.rectangle.angled |
reduce reflections with on-device AI, linked to Polarizer strength | linked through the filter’s Region |
| AI Removal | eraser |
fill selected distractions from their surroundings, review before applying | no (Base only) |
| Repair | bandage |
retouching via smart or manual repair brush | no (Base only) |
| Film Stock | film |
film negative and photo paper simulation as the last step before output | no (Base only) |
Inside a mask, exactly five tools are available: Light, Color, Selective, Curve, and Details — the same controls as in the base, but limited to the mask’s area of effect. All other tools (Crop, Depth, Lens, Repair, AI Removal, and Film Stock) are opened in the base. The Polarizer, including its reflection reduction, can be linked to a mask under Region.
Histogram and clipping warnings
The luminance histogram is visible by default in a slim row above the image, without covering it. Dark tones are on the left, bright tones on the right. Close the histogram to return its space to the image; use Show histogram to bring it back.
The two edge switches mark clipped shadows in blue and highlights in red. These are colored warnings, not a blinking zebra display. The histogram and warnings describe the developed preview, not unprocessed sensor data; they do not prove whether detail can be recovered from a RAW file. Warning overlays are not exported. The histogram behind the tone curve instead shows tones before that curve adjustment.
Control conventions
- Double-tapping the numeric value resets that control to its default. For most controls, the circular-arrow button next to it does the same thing, and is disabled whenever the value already matches the default.
- Values appear with or without a percent sign depending on the control — both display forms are the same ×100-scaled value; only the presentation differs between control types.
- Presets (crop ratios, lens characters, film negatives, and so on) are horizontally scrollable chip or menu lists, not controls in the strict sense.
Practical tips
- Looking for masks or filters in the tool rail and not finding them — that’s not a bug. Add them with the + in the layer ribbon, and the matching adjustment panel appears automatically.
- Try switching between the base and a mask layer in the layer ribbon to see how the available controls in the adjustment panel change.
- Double-tapping is the fastest way to test a single control: pull it in briefly, then reset it, without losing the rest of your edit.
Image information
Tap the file name at the top or choose Image information from the menu to see the full file name, pixel dimensions, bit depth, and any available capture and photographer information. Changed control values use the accent color; default values remain neutral. For RAW files, the decoder is also shown; a saved project retains its decoder version.
Tool order and the iPad workspace
The tool rail follows the editing workflow: Crop, Light, Color, Curve, Selective, AI Removal, Repair, Details, Lens, Depth and Film. Masks and filters are reached through the layer ribbon. On iPad, the extra space accommodates the image and inspector; use the divider to adjust their balance.